Erik Sloan’s Bigwall Personal Gear Guide
 Bigwall Harness
The trad climbing harness you already have is probably perfect for bigwall climbing, as long as it has a haul loop on the back and plenty of gear loops. The special “bigwall” harnesses are designed for long difficult walls, where you are on lead for many hours each pitch. They are too bulky/heavy for free climbing and the simple, easier climbing found on beginner walls. I like the Metolius “Trad” harnesess because they’re comfy enough and the gear loops are super bomber…..my more comfort minded friends swear by Petzl harnesses.
 Aiders
Aiders can have both differing step heights and overall lengths, so it would be best if you can borrow a pair your first couple times to see what style you like. Ladder style aiders(far left) with a plastic spreader bar are the most popular. If using standard or “offset” aiders(middle), folks 5’9” and taller should get aiders with a 14” step height (Yates and Metolius), shorter folks should get aiders with shorter steps (BD, Petzl).
Adjustable Aiders(far right)
Adjustable aiders are suitable only for cleaning pitches (and they’re not perfect for that), not for leading. They are more comfortable than regular aiders, but wear out quickly and don’t work well for cleaning traverses or lowering out. Adjustable aiders are specialty tools for speed climbers.
 Daisy Chains
There are two types of daises: standard (left) and adjustable (right). Standard spectra daises are more versatile, lighter, and long lasting. It is nice to have one adjustable (a third daisy) on steep routes like the Leaning Tower or Mideast Crisis. All but the shortest folks should buy 140cm/55”, or the longest daises available because once they get girth-hitched to your harness and twisted up they will seem a lot shorter and may impede your reach. If you can’t reach a piece you placed with your daisy you will have to click a quickdraw to it and then clip into the bottom biner of the draw. This will slow you down considerably and generally make aid climbing no fun.
 Ascenders
Also called jumars or jugs, ascenders are sold individually so make sure you buy a left and right handed ascender. Jugs wear out slowly so these are a good item to borrow if you can.
 Fifi Hook
The fifi lets you move around the belay and stay secure. Like a third hand, it allows you to hook into a piece while aid climbing to rest. Tie the fifi through your harness at about the length of your belay loop using strong webbing. The proper length changes depending on whether you are climbing a slab or an overhanging wall. Generally you want your fifi to be a length where you can just hook it in when your waist is at the piece.
 Gloves
Buy fingerless gloves at the mountain shop or pick up a cheap pair at the hardware store and cut the ends off just after your last joint, and wrap the ends with duct tape.Your hands get worked on the wall, so take care of them!
 Belay Device
On the wall you usually belay with a Grigri, but each climber in your team should always also have a belay device as well, as a back up or for rappelling. A light, simple one is fine because you will likely not use it much.
 Nut Tool
Get a sturdy nut tool so you can tap on it to get stuck nuts out. The Metolius tool with built in wrenches is good for Yosemite, where the bolts are often loose.
 Helmet
Helmets are like cars, they come in all shapes and sizes so pick out the one that fits you best. Make sure it has clips to secure a headlamp.
 Knife/Prussiks
Always carry a knife to cut old webbing off anchors or fixed pieces. Always carry two Prussiks (6’ loops of 6-8mm cord, tied up in a neat knot) as backup ascenders or to facilitate self-rescue.
 Headlamp
Buy a headlamp with a good beam for spotting anchors in the dark. Bring a small, simple beam headlamp as a backup. If climbing in winter or spring make sure you have a waterproof headlamp.
 Sticky Rubber Approach Shoes
These are probably the most important piece of personal gear you should buy. Approach shoes make your experience of walking to your climbs, on your climbs, and walking down from your climbs much more secure and enjoyable. Yosemite is full of talus and treacherous boulder fields which is where approach shoes really shine. Also crucial on the climb, approach shoes will make busting a short section of 5.5-5.7 seem casual compared to wearing regular hiking boots. While not cheap, you can often find approach shoe closeout deals on manufacturer’s websites, or at REI garage sales.
 Knee Pads
Thin knee pads worn under your wall pants are key to the rigors of wall climbing. Grab a pair at an outdoor store on your way to the valley.
 Free Shoes
Wear sturdy shoes that you can comfortably use all day long. You carry more weight in equipment on the wall, so there is more pressure on your feet. If your shoes are too tight you will suffer more, climb slower, and have less fun.
 Ditty Bag
This rugged chaulk bag sized bag of goodies stays on your harness for all except the most difficult free climbing pitches where you don’t want to carry the extra weight. Bigwall climbing is a slow-paced sport, often involving being a pitch above your haulbags and partner for long periods of time. The ditty bag keeps you happy and productive. A Camelback is another option that can be used in the same way.
Ditty Bag Supplies: 1. (2) copies of topo, 2. 1” Climber’s tape, for cuts or to put over nicks in the rope 3. Small amount of duct tape rolled up 4. Energy Bars/gels 5. Sunscreen. 6. Sunglasses 7. Camera, use it! 8. Lighter 9. Lip Balm, drink more water! 10. Can Opener 11.Watch (optional)
 Camera
Wall climbing is tiring, but the moments you capture on the climb are priceless memories. Throw your phone on airplane mode and you’re good to go! Look out for pitches that traverse or ways you can get a better perspective than just settling for the old ‘butt shot’.
 Wall Clothes
Remember two words: wool or synthetic. These are the only fabrics that are warm when they’re wet. Storms can happen at any time, and tend to be very cold, so be prepared. Even underwear should be synthetic. Nylon pants can be rolled up to the knees if it’s hot. Don’t wear shorts because you could get a rope burn in a lead fall that could become infected and serious on the wall. Wear wool/synthetic socks. Always bring a good winter hat or balaclava. That being said, don’t forget to protect yourself from the sun as well.
 Puffy Jacket
Synthetic jackets are warm when wet, and pack a lot of warmth into one package which is great when you’re on the wall and it can be difficult to find things in the haulbags. Most of the year nighttime temps on the wall are in the 30s or below, so a good puffy jacket makes getting out of your sleeping bag in the morning much easier.
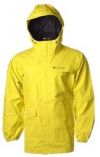 Rain Gear
Bring a great rain jacket, preferably a rubberized “fishing” style one. Yosemite’s deep cracks can become icy waterfalls after as little as a twenty-minute rainstorm. Kayaker dry-suit tops work great. Bring rain pants only if there is a chance of storm, as you will be wearing nylon wall pants already.
Shared Personal Gear:
 Grigri
On the wall, where you often have your hand off the brake end of the belay to retrieve gear, get in the haulbags, eat/drink, a grigri is essential. Each climber should also bring a personal belay device in addition to the grigri, for rappelling or as a backup.
 Baby Hammer
Yosemite has awesome nut placements. This means nuts get stuck very easily. Jerking a nut to clean it can bend and damage the wire. Always tap out nuts that you aid climbed on with a mini, lightweight hammer and your nut tool. The $1.99 hammer from the bin in front of the hardware store works perfect!
 Hammer
Once you venture off the easiest walls, you’ll want to bring a full size hammer in case a fixed piton or copperhead is missing and you have to replace it. Hammers last a long time, so this is a great item to borrow.
![]() Funkness Device. This is used with a full sized hammer to clean pitons if you are unable to clean them by hitting them up and down. The funkness is hard on gear, but if you get a cam stuck sometimes a couple tugs with the funkness will free it up. Dedicate two ‘leaver’ biners to the funkiness and make sure they don’t sneak back on the rack—they’ve been known to break after ‘funking’ recalcitrant pins.
Funkness Device. This is used with a full sized hammer to clean pitons if you are unable to clean them by hitting them up and down. The funkness is hard on gear, but if you get a cam stuck sometimes a couple tugs with the funkness will free it up. Dedicate two ‘leaver’ biners to the funkiness and make sure they don’t sneak back on the rack—they’ve been known to break after ‘funking’ recalcitrant pins.
 Belay Seat
Lightweight and easy to stowe, fabric belay seats are great for your first walls. Once you’re headed up the Zodiac or something similar, bring a plywood belay seat as the angle steepens and you are hanging more in your harness.
 Music
Music
Nothing helps you motivate in the morning like favorite tunes. Music will help you relax after dinner, and is a great companion at a long belay.
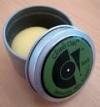 Hand/Teeth Care
Your hands take a beating on the wall. Bring wet wipes to clean your hands before dinner, and hand salve to repair any dings and scrapes. Cut down on clutter with one tube of toothpaste and one pack of floss. These items can all go in the “dinner” stuff sac.
 Stuff Sacks
You’ll need several different sized stuff sacs for your wall climbs. For example, break your food into two separate Breakfast/Dinner and Snacks stuff sacks.
 Water
Water
Recycled two liter soda bottles are great. I stop at a drug store on my way into Yosemite and pick up 1 gallon water bottles. They don’t pack as well, but you know they are new so they won’t leak and you don’t need as many of them. Outfit your bottles with clip in loops of 3-4mm cord girth-hitched around top. One small strip of duct tape is nice for keeping the girth-hitch tight.
 Stove/pot
Hard to beat the hanging Jetboil or all-in-one cooking setup. No matter how tired you are make yourself heat up your dinner and you will feel better, and sleep better.
 Poop Tube
Grab a one-two gallon paint bucket from the hardware store. Bring a full roll of toilet paper everytime just in case. For pooping, WAG bags or similar are studier than paper bags and already have detergent in them to mitigate smells.
 Portaledge/Fly
Always bring a rainfly. Practice setting your portaledge up, while hanging, before attempting to do so on the wall. The Runout Customs 10 lb double ledge is the best for most folks. Two heavier guys should go for the 15 lb Metolius ledge with spreader bar. The BD ledge is 20 lbs and burly, so good for expeditions.
 Sleeping Bag
Bring a synthetic bag. I like to bring a lighter weight bag and sleep in my puffy jacket if I’m cold.
 Inflatable Sleeping Pad
These are great for the many less than flat or level bivy ledges on walls. They are also more warm than a foam pad. Pad the ground with your rain gear or haulbag so it doesn’t get a hole.
 Bivi Sac
Bring a good one if there is any chance of a storm. It’s hard to beat the BD Hooped bivy with its sewn through clip-in point.
![]() Emergency Bivi Sac
Emergency Bivi Sac
If there is little chance of storm, save weight by bringing a 3-4 oz emergency bivi sac. These sacs are very warm, so if you are trying to climb fast and light, like on Half Dome, they pair well with a puffy jacket and an inflatable sleeping pad for a comfortable night’s sleep without a sleeping bag.